

Rock tumbling is a great way to try your hand at lapidary work. If you’ve ever been interested but didn’t know how to start, consider purchasing a rock tumbler. They are relatively inexpensive, fairly quiet, and are very easy to use. While we don’t consider ourselves experts, we have tumbled a rock or two, so please keep reading for more information on rock tumblers!
What rock tumbler should I buy?
There are many different brands of rock tumblers. You can find them on Amazon, through retailers, and even on Facebook Marketplace, Kijiji, etc. We currently sell 4 models of Lortone tumblers: the 3A (single 3 pound barrel), the 33B (double 3 pound barrel), the QT6 (single 6 pound barrel), and the QT12 (single 12 pound barrel). We are extremely proud to be official Lortone distributors. Not only can we source all the tumblers, but we can also source all the parts (belts, bearings, barrels, motors, etc.).
When purchasing a rock tumbler, do a bit of research on the brands that are available, plus what size of tumbler you might want. The bigger the barrel, the more expensive the tumbler, and the more supplies you will need. A great beginner size would be the 3 pound barrel (image below) – a set of grits will last you quite a while with this size compared to a 12 pound barrel. Keep the size in mind when choosing your tumbler. When you create your budget, be sure to plan for the other supplies you’ll need to purchase along with the tumbler. Here’s a list of the must-haves:
- Rock tumbler
- Grit
- Rocks!
- Optional: Plastic pellets or ceramic media

Grit
Now let’s talk about the all important ingredient when tumbling rocks – grit! Grit refers to the sand/powder substance called silicon carbide that we add to the barrel of the tumbler that grinds and shapes the rocks until they’re smooth. Without grit, your rocks will not become smooth and they won’t polish to a shiny finish. There are different options when it comes to choosing grit, but we have found a process that works great for us:
1st Stage – 60/90 grit (coarse)
2nd Stage – 120/220 grit (medium)
3rd Stage – 500 grit (fine, pre-polish)
4th Stage – Polish
Purchase this Tumbler Grit Kit here.
The 5th Stage (the one you didn’t know you needed!)
We also recommend a 5th stage when polishing your rocks. If you’ve ever finished the polished stage and your rocks didn’t come out as shiny as you were expecting, this stage is for you. Take your rocks and add them into the barrel with the normal amount of water. Add 2 tablespoons of shaved ivory soap or borax to the barrel. Run for 1-2 days to burnish your rocks. Hopefully, they come out shiny and polished!
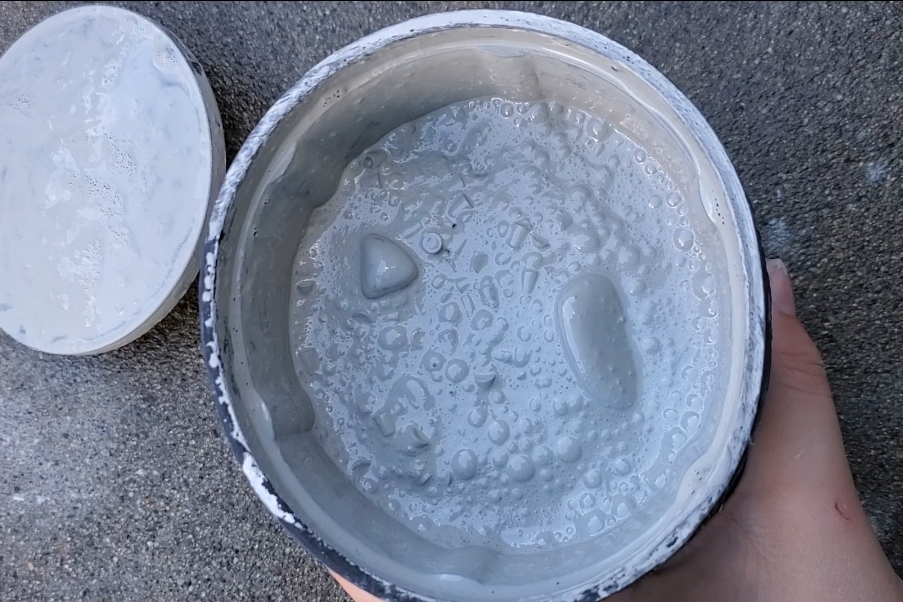
We like to run each stage for 7-10 days. You can check on your tumbler to see the progress of your rocks throughout each stage. Along with grit, you’ll also need to add water to the tumbler barrel to create a slurry. This will evenly coat the rocks and result in the smooth finish we look for. To know how much grit to add to your tumbler, use the table below. You should put in enough water to reach the top layer of rocks in the barrel, but do not completely submerge all of the rocks. If you’re not sure how much water to add, check your barrel after 1 or 2 days. Did the grit and water create a slurry? It should be foamy and have lots of air bubbles. If it seems too dry, add a bit more water. The photo below shows the slurry that the grit and water create in the barrel. You will also notice lots of air bubbles.
| Barrel Capacity | Amount of Rocks | Amount of Grit/Polish |
| 2 pound | 1 pounds | 2-3 tablespoons |
| 3 pound | 1.5 pounds | 3-4 tablespoons |
| 4.5 pound | 2.25 pounds | 5-6 tablespoons |
| 6 pound | 3 pounds | 7-8 tablespoons |
| 12 pound | 6 pounds | 15-16 tablespoons |
What rocks can I tumble?
There are many types of rocks that are suitable for tumbling. The most ideal rocks, especially for beginners, are harder stones such as agate, jasper, petrified wood, etc. You can purchase different types of tumbling rocks/rough here. Other rocks that tumble well include quartz, amethyst, aventurine, Tiger’s eye, obsidian, rhodonite, and the list goes on! You can also polish softer materials in a tumbler, but you may want to tumble them for shorter periods of time. Additionally, avoid mixing softer stones with harder ones in the tumbler. The harder stones will damage the softer ones, and the harder stones will likely require more time in the tumbler.
The size of the stones also plays a role in the effectiveness of the tumbler. If you have a smaller barrel, such as a 2 or 3 pound, you will want to limit the size of your stones. You will be more successful polishing small stones, loonie-sized or smaller. Larger stones may not polish as well in a smaller barrel. The larger the barrel, the larger the stones you can polish!
When adding the rocks to your tumbler, you will want to stop once the barrel is 2/3 full. If you overfill the tumbler, your rocks won’t have enough room to move and polish. Too little, and your rocks will have too much room and may chip and fracture.
Below are some photos of tumbled rocks. The first photo is a group of agates that hasn’t finished tumbling yet so they are not polished, but have been rounded out in the 1st stage. The rest of the photos are polished agates, and petrified wood!


Optional: Plastic Pellets and Ceramic Media
Many people also add plastic pellets or ceramic media to their tumbler. While it is not absolutely necessary for polishing your rocks, they can be helpful. After the first stage of tumbling, you’ll notice that your barrel is no longer 2/3 full – the abrasive grit has removed a lot of material from your rocks! To prevent chipping and fracturing, you can add plastic pellets or ceramic media into the 2nd stage. The plastic pellets or ceramic media act as a cushion in the barrel. Only add enough filler to get back to 2/3 full.
If you use plastic pellets in the 2nd stage, do not use those same pellets in the 3rd stage. You can reuse them, but only for when you are doing the 2nd stage in your tumbler. Below is a photo showing the plastic pellets that were used in the 2nd stage of tumbling these Monte Lake agates.
Ceramic media can be cleaned and reused for each stage. We prefer plastic pellets as they are lighter and easier to ship!

Cleaning your rocks and barrel
It is very important to clean both your barrel and rocks between each stage. If you bring grit from stage 1 into stage 2, your rocks will not polish properly. When emptying your barrel, do not pour your grit slurry down your sink – it can damage your drains. Dispose of it outside or in the garbage. The best way to empty your barrel and clean your rocks is by using a strainer. In the picture below, you will see a strainer that is normally used for gold panning. Pouring your rocks on top of a strainer over a bucket will make cleanup easier. Once you have emptied your barrel, wash your stones using water and a plastic brush if necessary. If your rocks have pits or they are odd shapes, they may require more attention. Once your rocks are cleaned, wash out your barrel with water and a plastic brush. Be sure to clean the lid as well, we do not want any grit from previous stages contaminating the next stage. Once you are satisfied with your cleaning job, you can move on to the next stage! You can wash your plastic pellets too, but remember they can only be used for a specific stage.

Final Thoughts
The most important thing to remember: have fun! Tumbling is a relaxing, easy way to polish your rocks. Not all rocks will polish to a glassy, mirror-like finish, so don’t be too disappointed if your rocks aren’t super shiny. If you don’t have any rocks of your own, you can purchase all types of rough rocks for tumbling. Don’t forget, patience is key as tumbling can take a while!
Rock tumblers are quiet in comparison to other lapidary equipment, but still make noise. The best place to operate one is in a garage, shed, workshop, or spare room in the basement. If you decide to use a box to soundproof your tumbler, be sure to keep a gap at the bottom to allow heat to escape.
Hopefully you have found the information in this blog useful in your tumbling journey. If you have any questions, feel free to contact us and we would be happy to help! Rock on!